Knowledgebase
Portal Home > Knowledgebase > CRM Hosting > How to install the Dynamics CRM 4.0 Data Migration Manager
How to install the Dynamics CRM 4.0 Data Migration Manager
1.     Download Microsoft Dynamics CRM 4.0 Data Migration Manager (HERE) and save it to your desktop. Double click on the file. If prompted, accept the Windows security warning by selecting the “Run” buttonon
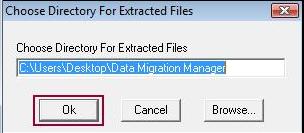
2.     A pop-up window will appear asking you where to extract the file. Choose the default location and press the “OK” button
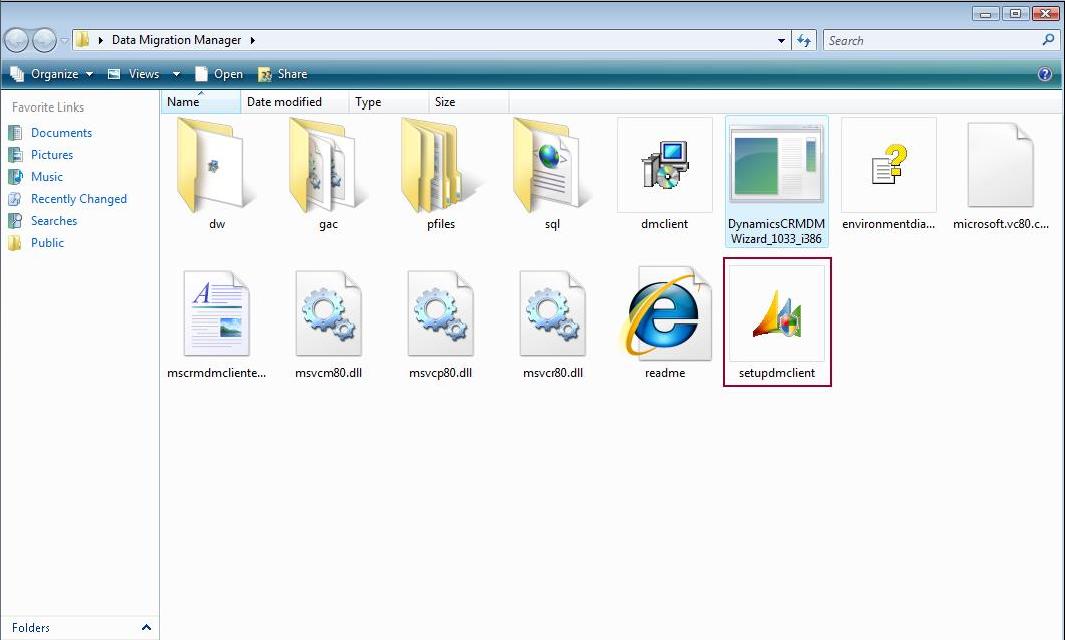
3.     Next, double click on the icon entitled “setupclient” to start the installation
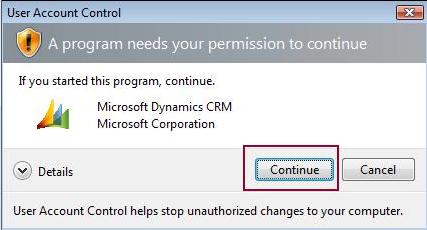
4.     Depending on your version of windows, a pop-up window may appear asking for installation privileges. Press the “Continue” button to proceed with the installation
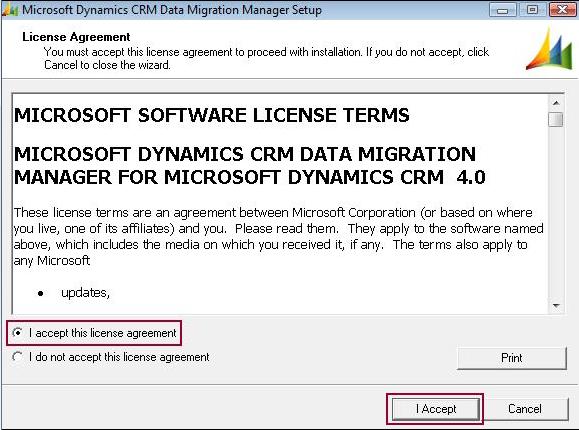
5.     The License Agreement window will appear. You must check the “I accept this license agreement” radio button and then click the “I Accept” button to continue with the installation
6.     You will now be asked to Specify database server. Select the radio button “Use SQL Server Express (will be installed, if necessary)” and then press the “Next” button
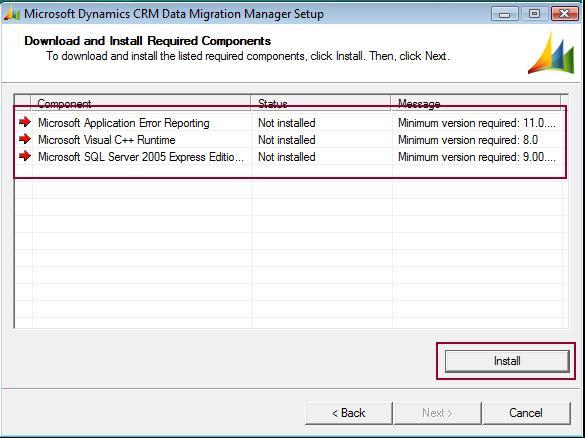
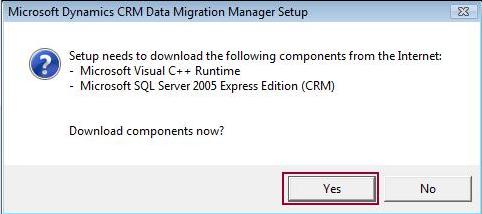
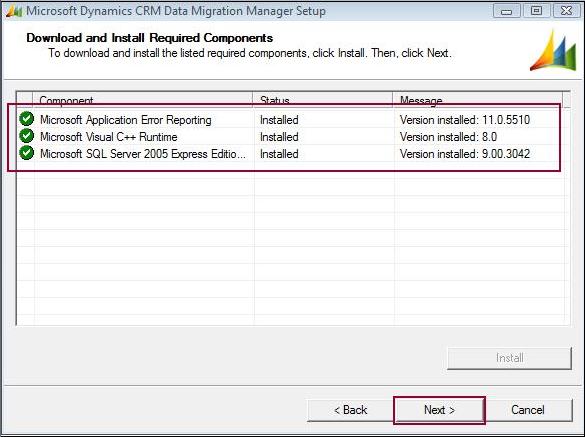
7.     If required, you will be asked to install required components to complete the installation of the Data Migration Manager. Please press the “Install” button to proceed. Then press the “Yes” button when asked to download components from the internet and finally press the “Next” button after all components have installed successfully
Part II: Installation
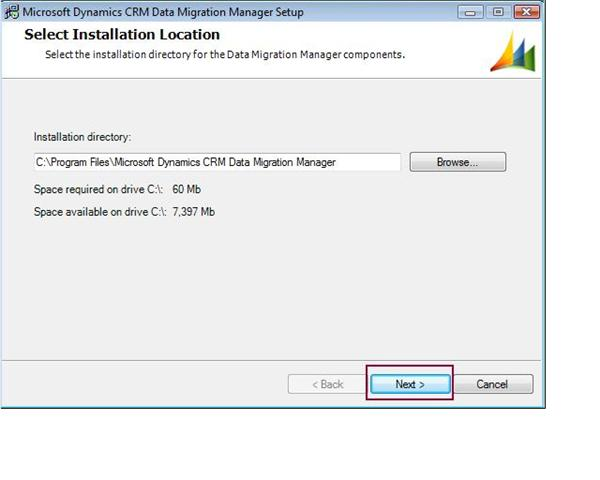
1.     After the preparation phase, you will now complete the installation of the Dynamics CRM 4.0 Data Migration Manager by installing CRM to your computer and should now be seeing the Select Installation Location window. Choose the desired location of where you intend to install the Data Migration Manager and then press the “Next” button
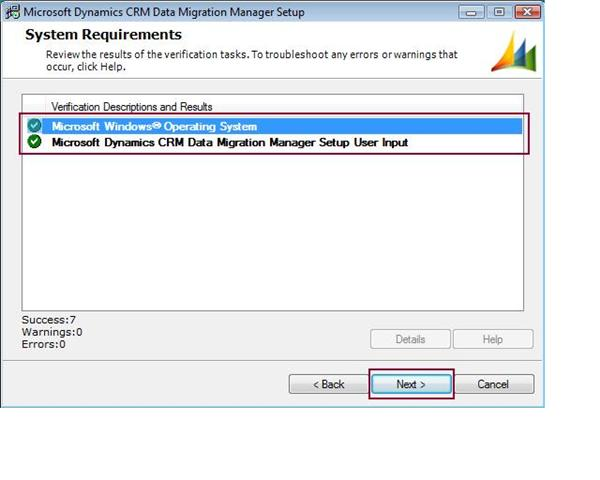
2.     The Systems Requirements window will appear and validate that the required system components are available. Correct any errors, if any, and press the “Next” button to continue with the installation
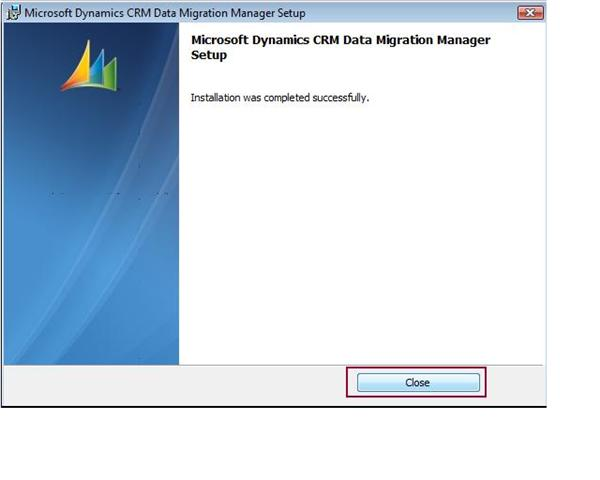
3.     The Data Migration Manager should now install on your computer. A pop-up window will confirm that the installation was successful. Press the “Close” button to finalize the install
Part III: Configuration
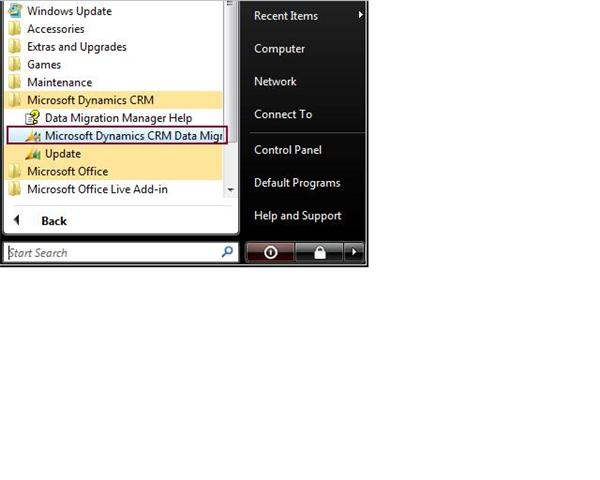
1.     In order to use the Data Migration Manager you will need to configure the software to connect to your CRM site. Click and open the Data Migration Manager in the program files under the folder Microsoft Dynamics CRM or directly via : \Microsoft Dynamics CRM Data Migration Manager\DMClient\res\web\bin\Microsoft.Crm.Tools.DMWizard.exe
2.     If prompted by the User Account Control window, press the “Continue” button to proceed.
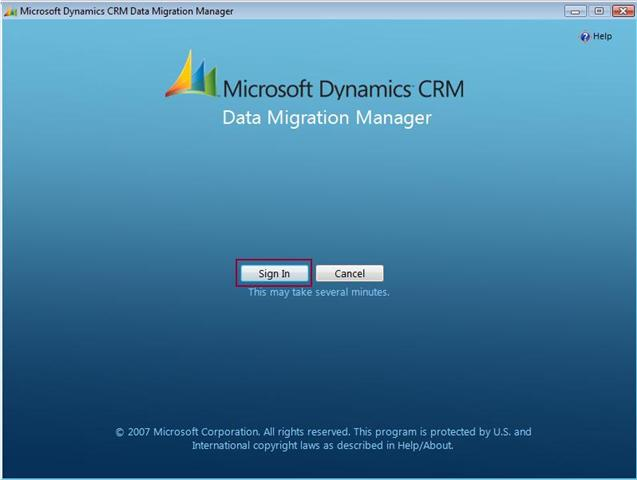
3.     The Data Migration Manager will now start. Press the “Sign In” button to continue
4.     Press the “Next” button in order to allow the Microsoft Dynamics CRM Data Migration Manager Configuration Wizard to connect to your CRM site
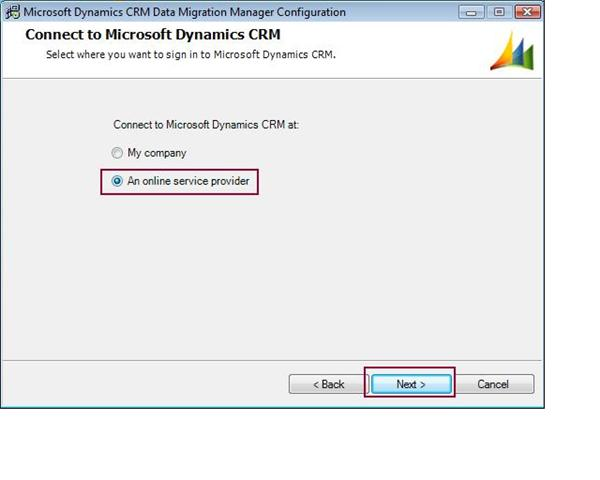
5.     A new window will appear prompting you to select where you will sign-in to the Data Migration Manager. Click the radio button “An online service provider” and then press the “Next” button to continue
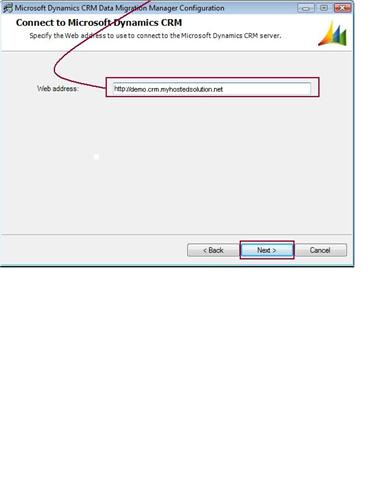
6.     Next, you will be asked to enter in the web address of your CRM site. You can find it via your hosted control panel. After entering the URL, press the “Next” button to continue
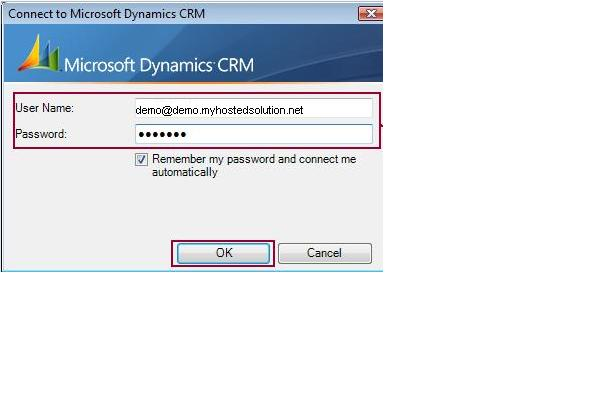
7.     You will now need to enter the username and password of your CRM user with the System Administrator role. Check the ”Remember my password and connect me automatically” box if you desire. Finally once satisfied press the “OK” button
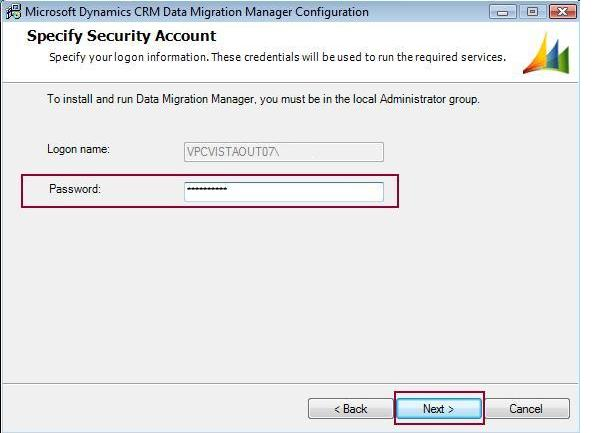
8.     For Vista users you may be challenged to enter your local Administrator group password. Please do so now, or contact your IT department in order have your permissions enabled. Once satisfied, press the “Next” button to continue
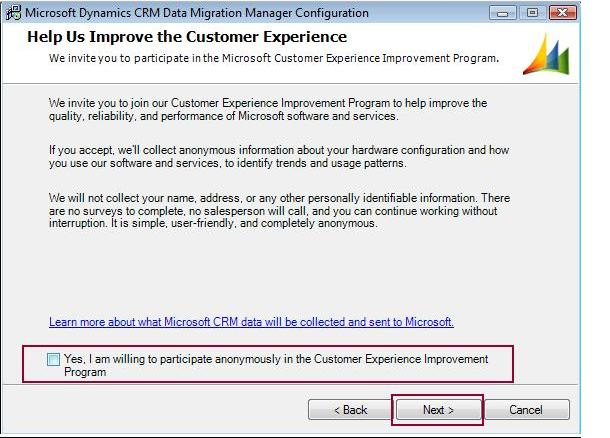
9.     The Help Us Improve the Customer Experience window will appear. If you desire you can check the “Yes, I am willing to participate anonymously in the Customer Experience Improvement Program” or leave it unchecked. Once satisfied, press the “Next” button
10.     The Data Migration Manager will run a validation check that it can connect to your CRM SQL server. Press the “Press” button once after you have corrected any errors
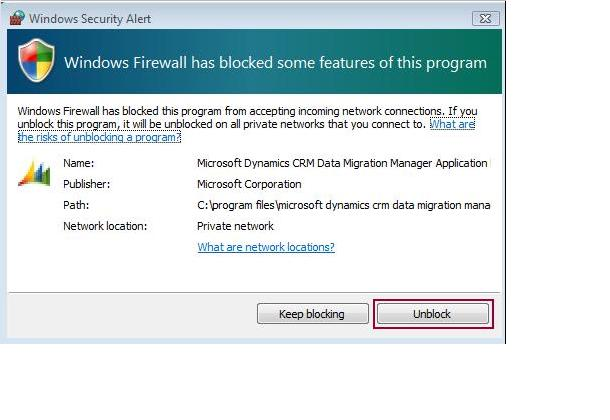
11.     A Windows Security Alert may appear. If so, press the “Unblock” button in order to complete the installation of the Data Migration Manager
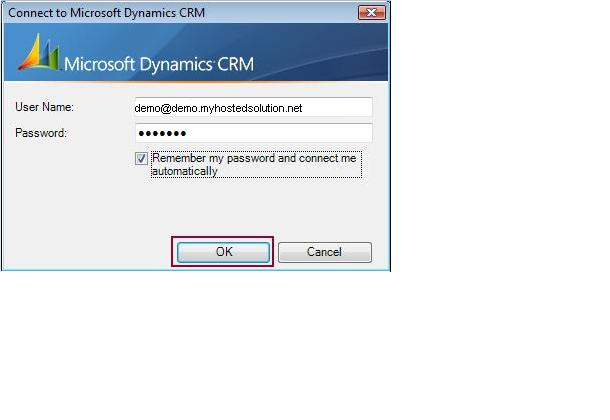
12.     Finally you will be prompted once more to enter in your username and password. Check the “Remember my password and connect me automatically box if you desire. Once done, press the “OK” button to login
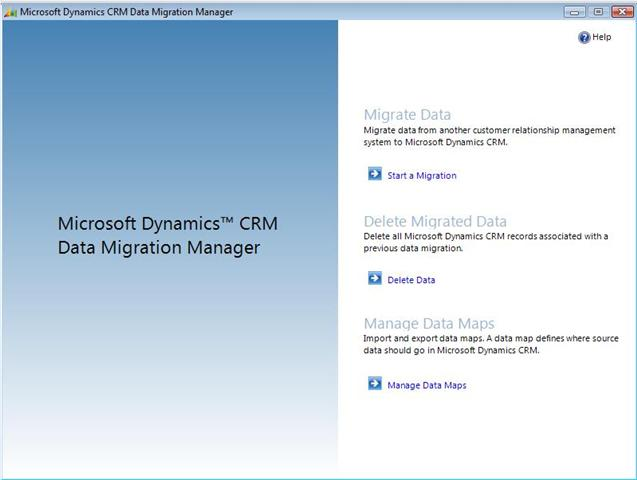
13.     Success. You should now be seeing the start screen of the Data Migration Manager. This is the portal to which you will be importing your data into CRM. If you are unfamiliar with the tool, please take time to read carefully the help files or contact support@ibspoint.com and we can consult with you on the steps necessary to successfully migrate data
Â


 Add to Favourites
  Print this Article

Support Center Quick Links
Search


