


System Mail Log Viewer
The Mail Log Viewer is an easy to use interface that you can use to monitor email traffic processed by your SafePoint system. To access the Mail Log Viewer System select the “View System Mail Logs” link in the menu bar and then click on either the “CLICK HERE TO OPEN MAIL LOG VIEWER” link or the mail log viewer screen image.
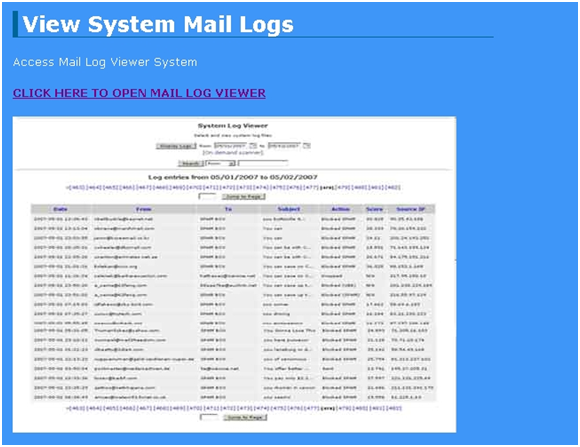
This will open the System Mail Log File Viewer screen. When accessed the mail log viewer will initially display the mail logs relating to email activity on your SafePoint system up to midnight (system time) on the previous day.
Log files are stored on your SafePoint system for up to 30 days so you can use the “Display Logs” function at the top of the mail log viewer screen to select the date range that you would like to have logs displayed for.

There will usually be multiple pages of log files for any given day, as many as up to several hundred pages or more if there is significant email activity happening on your SafePoint system. You can scroll through these pages using the numbered buttons at the top of the Mail Log Viewer screen or otherwise use the “Jump to Page” option for navigation.

The “Search” feature allows you to search the currently generated log file entries in terms of “From”, “To”, “Subject”, “Action”, “Score” and “IP” values. You can search for email activity records based on any of these terms by placing the term you are looking for in the search box and selecting the appropriate “From”, “To”, “Subject”, “Action”, “Score” and “IP” from which you expect to have results displayed.
To search for email from a given address for example you would place the exact address you are looking for in the search field. If you are uncertain of the exact email address, subject, etc you can use the “wild card” feature to search on the basis of partial term.

The “wild card” character used in the Mail Log Viewer system is the “%” character. For example if you wanted to search for all of the email from all of the addresses at the domain “example.com” you can use the search term “%@example.com” and this will return results of all of the email from any and all address at the “example.com” address.
Another example is that if you were searching for an email from a friend and your friend usually places something like “From Bob” in the subject line, but sometimes uses “Hi, from Bob” instead so you can’t really be sure of the exact subject line. In these sorts of cases you can use the “%Bob%” wild card search term to search all of the subject lines and display records of any and all email messages which contain the term “Bob” in the “Subject” line.
The “wild card” search is very flexible and powerful and can be used to quickly and easily locate the record relating to any email activity processed by your SafePoint system.
If you wish to view log file records of email processed by your SafePoint system after the previous midnight system time up until the present moment you can use the “ON DEMAND SCANNER” to generate and display logs relating to more recent activity on your SafePoint system.
The on-demand log output can then be sorted and displayed in a number of time formats including “Last 24 hours”, “Last 12 hours”, “Last 6 hours”, “Last 60 minutes”, “Last 30 minutes”, “Last 5 minutes” and “Last 60 seconds.
To start the On Demand Scan click on the “ON-DEMAND SCANNER” link at the top of the Mail Log Viewer system screen.

Depending on the amount of email activity on your SafePoint system since the previous midnight system time it may take up 60 seconds or more for the current log files to be processed and displayed by the system.
Once the processing has completed you will be presented with a display of the system log files starting at the previous midnight system time and continuing up to the exact moment which you started the on demand scan by selecting the “ON-DEMAND SCANNER” link.
You will then be able to either use the numbered navigation bar to navigate through the displayed log file records or the “Jump to Page” option to jump to a given page number. Otherwise you can use the “Display Logs” function at the top of the screen to display the logs for a given time period from the previous midnight up to the moment you initiated the on demand scan.
Once you have finished reviewing the output generated by the On Demand Scanner it recommended that you select the “END ON DEMAND SCAN” link to end the On Demand Scan and clear up the on-demand scan database. This will re-set the On Demand Scanner and allow you to perform further up to the moment on-demand scans of the system log files if desired.

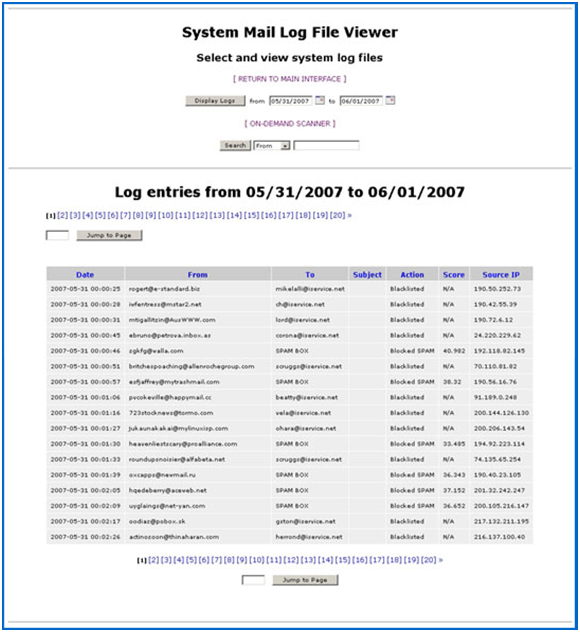
The Mail Log Viewer system displays the “To”, “Subject”, “Action”, “Score” and “IP” records of email activity on your SafePoint system for any given date range selected.
The “Date” field indicates the exact date and system time which a given email was processed by your SafePoint system.
The “To” field indicates what email address the various messages were delivered to.
The “Subject” line is the subject of the message, of which the first 15-20 characters is displayed by the Mail Log Viewer system.
The “Action” field specifies what action was taken by your SafePoint system with regards to a given message depending on how your SafePoint system has been set up to process Spam/UCE and Virus laden emails etc.
The “Action” field will usually contain a specific reason why a particular action was taken with respect to the processing of a given email message.
For example, if the “action” associated with a particular email is “Sent” this would indicate that the message was processed by your SafePoint system and was not rejected due to RBL/Blacklisting or Connection Control issues and also that it was under the current “Action” level set in the “Spamfilter Config” screen.
As a result, this message would not have either been blocked entirely or otherwise sent to the Spam Quarantine. The message may have been “Tagged” as “Spam” and delivered to the recipient if it scored over the “Tag Level 2” set on your SafePoint system. This will usually be indicated in the “Subject” field with the “***SPAM**” subject line.
Otherwise, if under the current “Tag Level 2” set on your SafePoint system, the message would likely have been “passed clean” and forwarded on to the end user recipient. This would indicate that it was processed by your SafePoint system and determined to be under the current criteria for Spam/UCE and also free of any Virus or other harmful attachments so it was delivered on to the end user recipient as being most likely a legitimate email message.
Other “Action” attributes which can be associated with email are “Blocked SPAM”, which means that a given message was above the current “Action” or “kill” level set on your SafePoint system and therefore was sent to the “Quarantine” mailbox on your SafePoint. This will also usually be indicated in the “To” field with the message recorded as being sent to the “SPAM BOX”.
One “Action” attribute you will likely see associated with a considerable number of mail log records is the “Blacklisted” attribute. This means that the message was blocked entirely by your SafePoint as a result of either the IP address, domain or email address that was associated with the message being listed in one of the RBL/Blacklists activated in the “RBL/Blacklist Settings” screen of the SafePoint control panel.
Otherwise, the IP Address, Domain or Email Address associated with the blacklisted message may have been in one of your local IP Address, domain, or email address blacklists as configured in either the “IP/Domain Blacklists” or “Email Address Blacklists” screens in your SafePoint control panel.
In the case of “Blacklisted” messages there will be no “Subject” line recorded and the “Score” will be listed as “N/A” as the message connection is dropped entirely by the SafePoint system before any processing occurs.
The “Score” field indicates what “Spam Score” a given message was allocated by your SafePoint system during processing. This “score” would be a reflection of the “Spam Score” associated with a given email message processed by the system as detailed in the Spamfilter Config section of the documentation.
The “IP address” field indicates the IP address of the connecting mail server from which a given message was either received or blocked for being contained in either one of the RBL/Blacklists or one of your own local blacklists.
If you notice a significant number of unwanted emails being received from a particular IP address which you would prefer not to receive and which for some reason are not already being blocked by your SafePoint system, you can decide to obtain the IP address from the Mail Log Viewer system screen and configure it in your own local blacklist. This would be done via the “IP/Domain Blacklists” screen on the SafePoint control panel.
In order to log out of the Mail Log Viewer system and return to the main interface click on the “RETURN TO MAIN INTERFACE” link.
| Next : Mail Queue Manager |